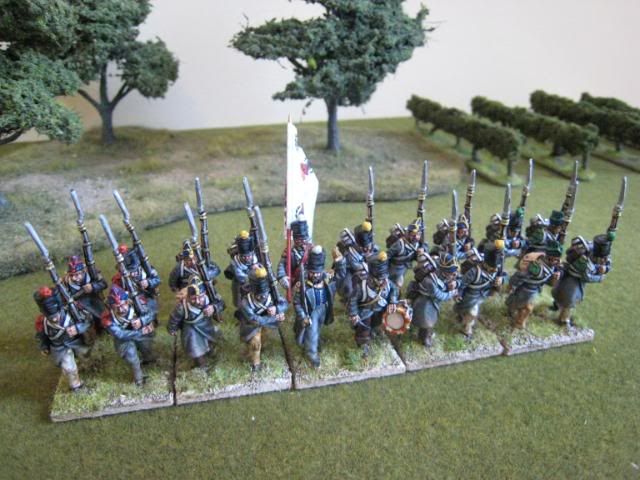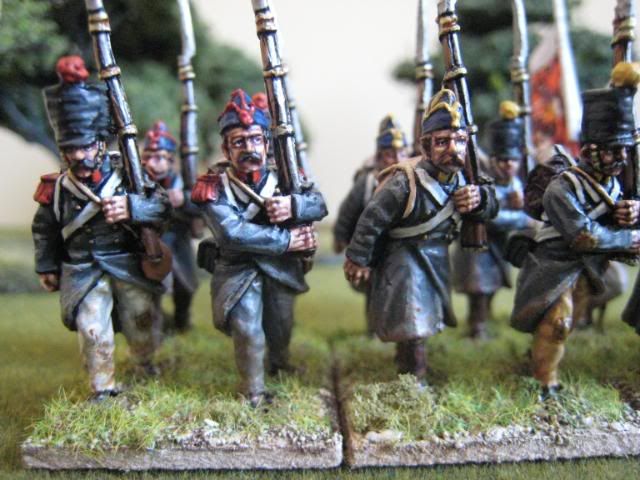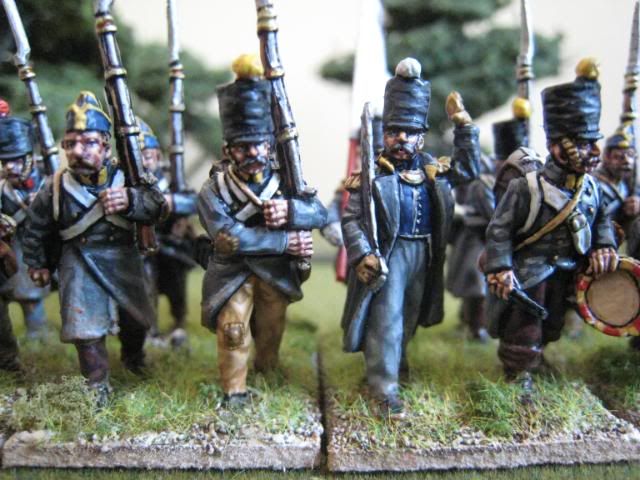
For my second regiment of Isabelino line troops I decided to use the figures in greatcoats and assorted headgear. This "look" is probably much more appropriate and realistic than the parade ground uniforms worn by my Princessa Regiment. Re-supply was a problem for the Isabelino armies during campaign months and their units could find themselves as strapped for kit as their Carlist counterparts. Taking inspiration from the way El Mercenario paints his FCW figures, I added patches to the trousers and coats, gave many of the figures stubble and used my burnt umber pastel and some brown acrylics to add some dirt to the clothes. I think the result conveys the look of men who have been campaigning over harsh terrain for some time. The sculpting helps - the figures seem to be bending forward with their heads down, as if marching into a winter storm over the Basque mountains.
I really enjoyed painting these figures. At a push, you could even perhaps use them for Napoleonic line. I chose the Borbon Regiment simply because flags for this unit are available in the Adolfo Ramos range. It was one of the army's newer regiments, raised in 1796. The greatcoats were painted with the Foundry "Slate Grey 32" palette, with the colours mixed and blended together on the figures (which is how I approach large areas of the same colour, like horses). The patches were painted with the "Deep Brown Leather 45" palette; one trick I picked up from examining El Mercenario's figures at the Perries' was to paint in the stitching around the edge of the patch (I used Foundry "Boneyard 9A") - this makes it look much more realistic, I think.
20 figures. Painted July 2009. Flag by Adolfo Ramos.


6 comments:
I like the dirty look a lot. Very realistic.
Giles, you're taking the 'campaign look' to a new level! Well done!
They are outstanding figures.
I like the patch stitching,it does work well. It is always a high risk strategy to paint in something that could not possibly be seen with the eye. If it comes off it looks 'just right' but I have seen patches that looked like they were held in place with an industrial stapler.
In this case I will sincerely admire them without ever trying it myself. But I will attempt to be less lazy when I dirty up a unit.
Inspiring! Thank you.
John
Outstanding unit, as ever Giles. Can I ask how you got the dirtied clothing look....paints? washes? pigments?
Thanks for the kind comments.
John, I learnt much from examining the Perries' Carlist War figures up close a few weeks ago. I had been sceptical about the stitching when I first heard about people painting it in, but I was also unsatisfied with simply painting on a patch and leaving it as a blob of different colour - that didn't work either. However, seeing what Javier had done with his patches for the Perries suggested that adding some stitching improved the look no end. As you say, sometimes painting things that the eye could never see works in a way that is hard to explain.
Anon, I use a combination of artists pastels ("normal" pastels, not the oil ones) and acrylics. I start by dusting the trousers and bottom of the coats with a pastel (any dark brown pastel will do - you can get them for under £1 each in any art shop). The pastel leaves a powder, and you can add more or less of it according to how hard you rub the figures with the pastel. Depending on the pose of the figure, it can be difficult to get a uniform coverage with the pastel because of the pastel's shape (i.e. the end is either square or round). I then get an old brush and dry-brush the same areas quite hard with a mid-brown (I use GW "Bestial Brown") and then a lighter brown (I use Foundry "Dusky Flesh 6C"). It's important to use quite thick paint, so old paints that are drying up are perfect. Dry-brushing serves three purposes: (1) you can access those parts of the figure that you couldn't reach with the pastel; (2) the lighter tones give the impression of older, cracked mud - I suppose, when thinking about how mud would attach to clothing, one should apply the lighter tones first and then the pastel, but (3) the dry-brushing can "seal" bits of the pastel powder and create a nice blending effect. Lastly, you have to be careful when varnishing as the pastel powder will run if you apply liquid varnish with a brush (as I do). This is not a problem if you are careful, because the varnish can "streak" the pastel powder which I think creates a nice effect - you could do something similar to create the effect of tunic dye running into white trousers, for example. Bits of pastel will get stuck in your varnish brush, so you have to wipe that off because varnishing non-pastelled bits of the figure!
This method is much quicker than it sounds. I also used it on my French Nap infantry, which can be found by following the relevant label. The only tricky part is the varnishing - I always paint the uppoer halves of all the figures I am varnishing in a session first, before getting to work on the bits with pastel powder on them. This may not be an issue with spray-varnishing, I suppose. Also, I gather that you can buy "weathering powders" from Tamiya and probably other people, which sound similar to pastels.
Giles
Crikey! I am speechless, really. Just exceptional. Model soldiers that look like...soldiers!
Post a Comment